1. Introduction to Block Programming
Block programming is a beginner-friendly way to learn programming. Instead of typing text-based code, users drag and drop colorful blocks that represent commands. This makes programming visual, intuitive, and engaging.
Like solving a puzzle: You connect blocks to create programs.
Used for: Games, animations, mobile apps, robotics, web development, and more.
Examples of block programming platforms: Scratch, Blockly, Snap.
2. Advantages of Block Programming
No syntax errors (no typing mistakes).
Visually appealing and easy for beginners.
More time for creativity and logic building.
Easy transition to text-based programming later.
3. Applications of Block Programming
Education: Block programming is used in schools to teach coding basics visually, making it easy for students to learn logic and problem-solving without typing complex code.
Game Development: It allows users to create fun games by dragging and dropping blocks, helping them focus on game design and storytelling instead of syntax errors.
Mobile App Development: Beginners can design simple apps for Android and iOS using block-based tools, learning app structure without needing advanced programming skills.
Robotics: Block programming controls devices like micro:bit and Arduino, letting students program robots and smart gadgets to move, sense, and interact with the world.
Web Development: It helps build interactive website elements visually, serving as a stepping stone before learning HTML, CSS, and JavaScript coding.
Creative Projects: Users can make animations, digital art, and interactive stories by combining blocks, encouraging creativity and expression through technology.
Data Science & Visualization: Beginners can create charts and analyze simple datasets using blocks, making data concepts visual and easier to understand.
4. Introduction to SCRATCH
What is Scratch?
Scratch is a block-based visual programming language and online community created by the MIT Media Lab in the USA. It is completely free, open-source, and designed to help beginners learn coding through creating interactive games, animations, and stories. The latest version available is Scratch 3.0, which runs both online and offline and supports a wide range of devices.
How to Get Scratch:
You can access Scratch online through the website scratch.mit.edu. For offline use, you can download the Scratch desktop app from the same website. There is also a mobile app available for smartphones and tablets, which you can download from app stores like Google Play or the Apple App Store.
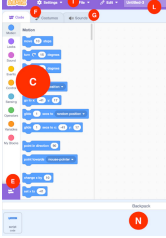
5. Scratch Interface Components
The Scratch interface is designed to be visual and user-friendly. At the center is the Stage, where everything you create like games, animations, and stories—is displayed and comes to life. On the Stage, you place Sprites, which are the characters or objects (like the default cat) that you can program to move, speak, or interact.
To the left, you will find the Blocks Palette, a colorful toolbox containing coding blocks organized by category, such as Motion, Looks, Sound, and Control. You drag these blocks into the Scripts Area, the large workspace in the middle, where you snap them together to write programs for your sprites.
Above the Blocks Palette are the Costumes Tab and Sounds Tab. The Costumes Tab allows you to edit or create new appearances for your sprites, while the Sounds Tab lets you add sound effects or music to your project. You can also add extra functionality using Extensions, which enable features like drawing with a pen, making music, or connecting to hardware like the micro:bit.
Finally, the Green Flag at the top-right of the screen acts as the "play" button clicking it starts your program and brings your creative ideas to life on the Stage
6. Scratch Blocks - Types and Colors
In Scratch, coding is done using different types of color-coded blocks, each with a unique function. The Motion blocks (blue) control how sprites move—turning, gliding, or changing position. The Looks blocks (purple) change a sprite’s appearance, allowing it to say something, switch costumes, or show special effects.
To add sound, Sound blocks (pink) play music, notes, or recorded audio. Events blocks (yellow) are used to start scripts, like when the green flag is clicked or a key is pressed. Control blocks (orange) manage the flow of a program with loops, waits, and conditional statements (if-then-else).
For interaction, Sensing blocks (light blue) detect inputs from the keyboard, mouse, or even other sprites. Operators blocks (green) handle math operations (+, –, ×, ÷) and logic comparisons (like greater than, equal to). Variables blocks (orange) store and change data, such as scores or timer values.
Finally, My Blocks (pink) allow you to create your own custom blocks, letting you bundle repeated code into a single reusable command for more organized and efficient programming.
7. Making a Simple Scratch Program
Example: Cat says "Namaste!"
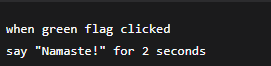
Steps:
- Open Scratch
- Drag yellow "when green flag clicked" block
- Drag purple "say" block
- Type "Namaste!"
- Click green flag to run
8. Making a Game in Scratch
Example: Dustbin Game
- Delete cat sprite
- Add dustbin sprite
- Add falling objects (egg, bottle)
- Code dustbin to move with arrow keys
- Code objects to fall from top
- Add score variable
- Add backdrop and sounds
9. Introduction to MICRO:BIT
What is micro:bit?
- Small programmable computer
- Size of a credit card
- Made by BBC (UK)
- Used for physical computing
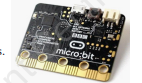
Parts of micro:bit:
- 5×5 LED grid (25 lights)
- 2 buttons (A and B)
- Light and temperature sensors
- Microphone and speaker
- Pins for connecting wires
Uses of micro:bit:
- Games (rock-paper-scissors)
- Fitness trackers
- Music instruments
- Smart home devices
- School projects
10. Introduction to ARDUINO UNO
What is Arduino UNO?
The Arduino UNO is a popular microcontroller board widely used for electronics and DIY hardware projects. It is more advanced than the micro:bit, offering greater flexibility and control for complex creations. The board features 14 digital pins and 6 analog pins, which allow it to connect and interact with a variety of sensors, motors, LEDs, and other electronic components.
Parts of Arduino UNO:
At its heart is the microcontroller (ATmega328P), which acts as the brain of the board. It also includes a USB port for connecting to a computer to upload programs, a power jack for external power supply, a reset button to restart the board, and built-in LED lights that can be programmed to blink or indicate status.
Uses of Arduino UNO:
Arduino UNO is used in robotics to control motors and sensors, in home automation to create smart lighting or security systems, in weather stations to collect environmental data, in 3D printers to manage movement and extrusion, and in science projects such as data logging, plant monitoring, and physics experiments.
11. Difference: Micro:bit vs Arduino
FeatureMicro:bitArduino UNOSizeSmallMediumBuilt-in sensorsYesNoBest forBeginnersAdvanced usersProgrammingBlocks, PythonC++CostLess expensiveMore expensiveSchool useVery commonCommon
12. Important Definitions
Block Programming = Visual coding with blocks
Sprite = Character in Scratch
Stage = Output area in Scratch
Physical Computing = Controlling real objects with code
Microcontroller = Small computer on a chip
Algorithm = Step-by-step instructions
Variable = Container for storing data